
How to Create Retro Print Effects [Photoshop]
There are lots of ways to take a photo and make it a little more interesting. Some of the most fun effects are actually making it look older than it is. Here we will discuss how to adjust new photos in Photoshop and give them that retro touch.

There are lots of ways to take a photo and make it a little more interesting. Some of the most fun effects are actually making it look older than it is. You can dress up like a flapper girl or a cowboy, but having the photo in the right tones really makes the photo look as if it’s straight from another time period. There are many photo programs available to play with your photos. Some come with pre-made filters that take one click. The most common photo editing software for pros and aspiring photographers is Adobe Photoshop. Here we will discuss how to adjust new photos in Photoshop and make them look older.
Get the Best Updates on SaaS, Tech, and AI
Sepia
Sepia is a nice auburn color that will take you right back to the ’20s and ’30s. It’s perfect for that old saloon look from the Wild West. You often see this effect used at carnival stands and photo studios where they dress you up in western garb. To get started, import your photo into Photoshop, be sure it is in RGB color mode. You can do this by selecting Image >Mode > RGB Color.

After you’re in RGB color mode click on Image > Adjustments > Hue/Saturation.
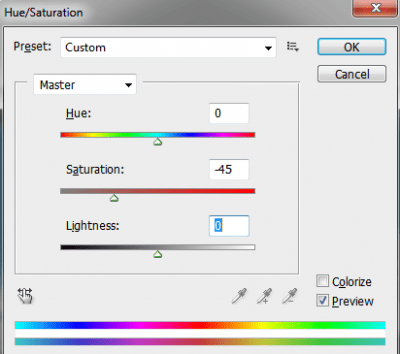
Take the saturation down to about -45. You’ll see the photo lose some of its bright colors.


Then go to Image > Adjustments > Color Balance.

Side the first bar towards red to about +35. Slide the last color bar left towards yellow about -35. This should give you a nice rich sepia-tone just like the old west photos. Every photo is a little different so your discretion and give or take a few points in any of these areas to get your photo just the way you like it.
Black & White
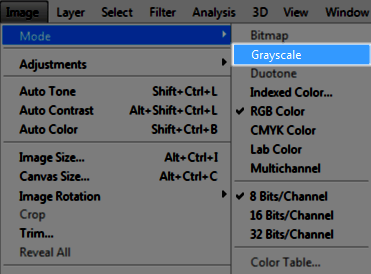
If you are looking for a more the 1940s or ’50’s black and white. First, let’s loose the color. Go to Image > Mode >Grayscale. Click on Discard.
From there let’s go to Image > Adjustments > Brightness/Contrast.
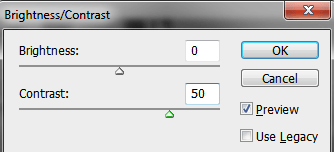
Increase the contrast to about +50. This should give you nice blacks, and bright whites and make it look a little more like a film. Again, use your discretion as every photo starts out differently. If you want more of a ’60’s look adjust the contrast up to +100 and turn the brightness up to about +50. This makes the image pop a little more like the spirit of the 1960s.
Retro Color Grain
For a retro 60s or 70s color film look, you need to get that rich yellowish warm tone into the photos. Again, import your photo into Photoshop. Go to Image > Adjustments > Brightness/Contrast.
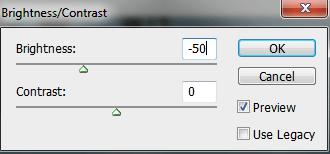
Take the brightness down to about -50.
Then go to Image > Adjustments > Color Balance.

Here, adjust the top slider +50 towards the red. With the second slider take +50 towards the green, and take the last slider -100 towards the yellow. This should give you that 40-year-old aged photo print look.
Play around with your Photoshop settings. You will discover hundreds of possibilities. Get creative and remember there is no right or wrong.
This article was written on behalf of PrinterInks – leading suppliers of printer cartridges and toners throughout the UK.
FTC Disclosure: The pages you visit may have external affiliate links that may result in me getting a commission if you decide to buy the mentioned product. It gives a little encouragement to a smaller content creator like myself.
8 responses to “How to Create Retro Print Effects [Photoshop]”